
Presence Tracking Wall Mount Application#
Introduction#
The Presence Tracking Wall Mount Reference Application shows how the A212 sensor can be used to count and locate people in a room from a sensor mounted on a wall. It tracks people both while they walk and while they sit or stand still.
Typical use cases are occupancy detection and people counting in rooms, meeting rooms and offices, and presence-driven control of lighting, climate and displays, where it matters both whether someone is present and where they are.
In the Exploration Tool, the application continuously shows:
whether the room is occupied,
how many people are in the room,
where each person is, as a dot in a 3D view of the room and on a floor plan,
where each person has recently been, as a trail.
Your First Measurement#
What You Need#
An A212 Evaluation Kit, see Setting Up Your XE212.
The Exploration Tool, see Getting started.
An account on the Acconeer developer site, and an internet connection the first time you use the application. The application’s processing is downloaded as a separate module the first time you select it; you log in and accept a license once. If you have no account, register first.
A wall to mount the sensor on, facing into the room.
Mounting the Sensor#
Mount the sensor on a wall about 2 m above the floor, facing into the room. Tilt it down so that it points roughly at the floor at the far end of the detection area, so that its field of view covers all of it. For a sensor at height \(h\) above the floor in a room of depth \(d\), the tilt is about \(\arctan(h/d)\) below horizontal, e.g. about \(20^\circ\) for \(h = 2\) m and \(d = 6\) m.
Mount the sensor rigidly. The sensor detects movements smaller than a millimeter, so a mount that vibrates, e.g. when a person walks across the floor, shows up as motion and causes false detections.
If the sensor is mounted in a corner or turned to the side, note the angle by which it is turned; you enter it as the pan in the next step.
Mount the board with the USB cable pointing down; the application expects this by default. If the USB cable points up, change the roll setting, see Sensor Installation.
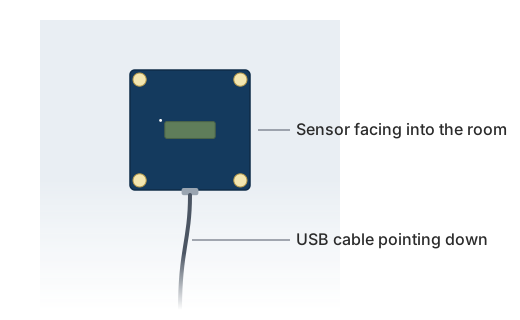
Figure 56 The sensor board on the wall, facing into the room, with the USB cable pointing down.#
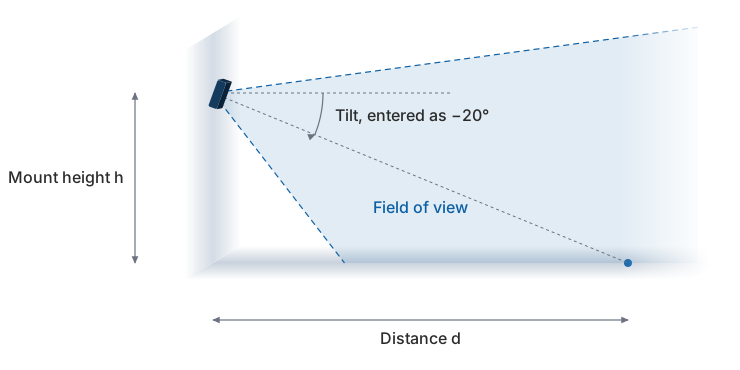
Figure 57 Side view: the sensor at mount height \(h\), tilted down so that it points at the floor at the far end of the area to detect in, \(d\) from the wall.#
Starting the Measurement#
Mount the sensor as described in Mounting the Sensor, connect the Evaluation Kit to your computer and connect to it in the Exploration Tool, see Getting started.
Select Presence Tracking Wall Mount in the left-hand menu. The first time, log in with your developer site account, accept the license and wait for the module to download.
In the Sensor Installation panel, set X rotation (tilt) to the tilt as a negative angle, e.g. -20° for a sensor tilted 20° down, Mount height to the sensor’s height above the floor, and Z rotation (pan) if the sensor is turned to the side (e.g. mounted in a corner).
In the Detection Volume panel, set X bounds and Y bounds to the floor area to cover, in meters from the sensor: X bounds to the side walls, e.g. (-2.5, 2.5) for a room 5 m wide with the sensor in the middle of a wall, and Y bounds from 0 to the opposite wall.
Press Start measurement.
Before the measurement starts, the application records a short noise reference with the transmitter turned off.
Walk into the room. A track appears within seconds, and the badge in the top right corner of the view changes to Presence Detected (1 person). Stop and sit down: the track stays on you. A person who stays still immediately after entering takes longer to be counted, see How It Works. When you walk out of the room, the track is removed after a few seconds and the badge returns to No Presence Detected.
Default Settings#
The default settings cover a room up to 6 m wide (\(\pm 3\) m to the sides of the sensor) and 6 m deep, with the sensor 2 m above the floor, measured 8 times per second.
Panel |
Setting |
Default |
|---|---|---|
Sensor Installation |
X rotation (tilt) |
0° |
Sensor Installation |
Y rotation (roll) |
180° |
Sensor Installation |
Z rotation (pan) |
0° |
Sensor Installation |
Mount height |
2.0 m |
Detection Volume |
X bounds |
(-3.0, 3.0) m |
Detection Volume |
Y bounds |
(0.0, 6.0) m |
Detection Volume |
Start, End (distance from sensor) |
derived from X and Y bounds |
Detection Volume |
Az angle range |
(-80, 80)° |
Detection Volume |
El angle range |
(-30, 30)° |
Sensor Setup |
Signal quality (dB) |
24 dB |
Sensor Setup, Advanced |
Frame rate |
8 Hz |
The tilt defaults to 0°, so set it for every installation.
The View#
The view has two tabs:
- 3D view
Shows the detection volume, the sensor and how it is mounted, the exclusion zones, and every person’s track as a colored dot with a trail of its recent positions.
- 2D Heatmap
Shows the same tracks and trails from above, as a floor plan, together with the outline of the detection volume and the exclusion zones. The buttons above the plot rotate and mirror it to match how you look at the room.
A badge in the top right corner of both tabs shows whether the room is occupied:
Presence Detected, with the number of people, when at least one person is confirmed,
Motion Detected when something moves, but nothing is confirmed to be a person yet,
No Presence Detected otherwise.
Motion Detected |
Presence Detected |
|
|---|---|---|
Means |
Something moves in the detection volume, but nothing has yet behaved like a person. |
At least one person is counted. The number is how many. |
Appears |
As soon as motion is detected. |
Within a few seconds if the person is walking. Within several seconds if the person is still. [*] |
Caused by |
People, but also any moving object (e.g. fans, curtains or plants). |
People. A moving object can count as presence too, see Limitations. |
Ends |
A few seconds after the motion stops. |
A few seconds after the last person leaves. |
Use it for |
Immediate feedback in your application that something is moving in the scene. |
Occupancy and people counting, e.g. climate control, room booking and keeping the lights on while people sit still. |
The Plot Settings panel controls the rest of the view:
History duration sets the length of the track trails.
Heatmap display mode draws a heatmap under the tracks in the 2D view, either in full or masked so that areas below the detection threshold are gray. It is off by default.
Show detections draws the current frame’s detections as dots, in both tabs.
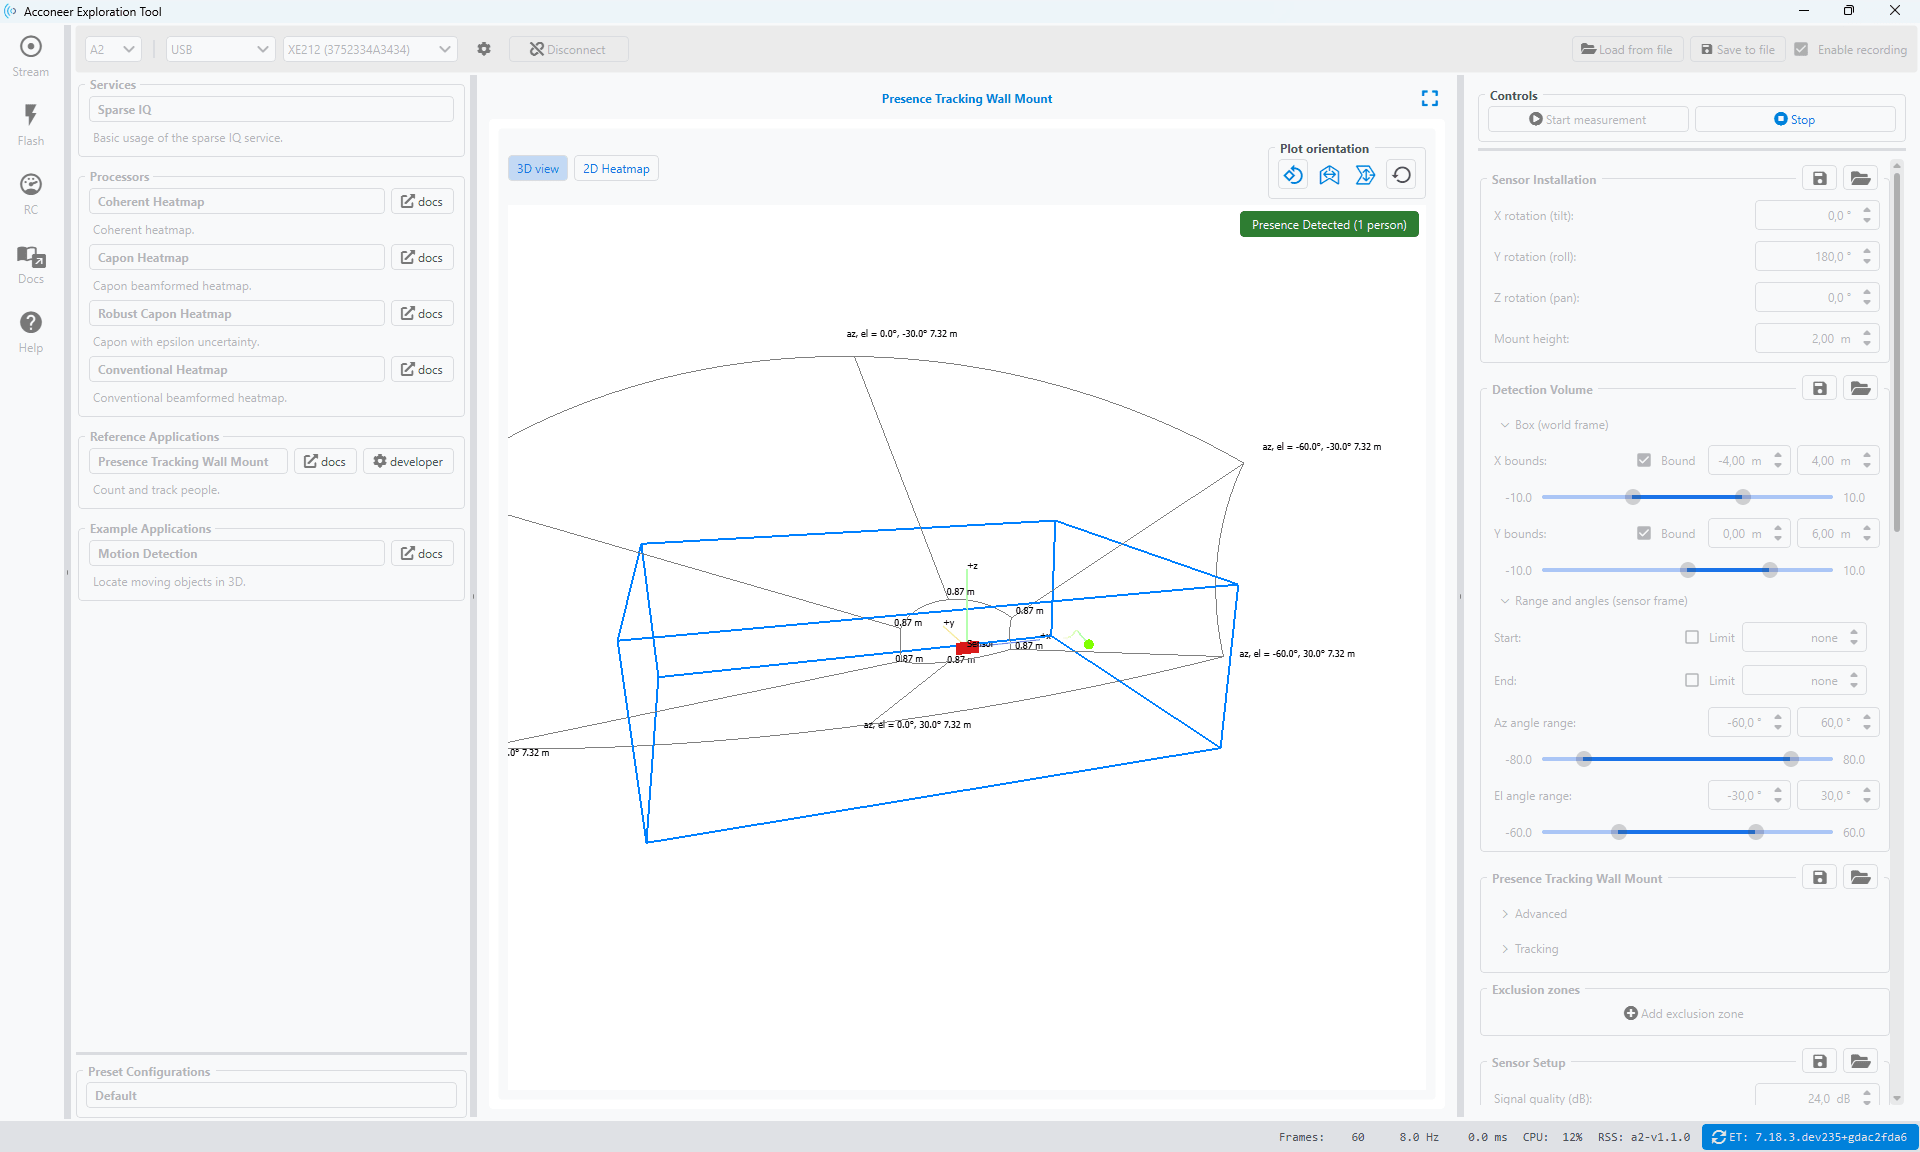
Figure 58 The application during a measurement: the 3D view with the detection volume and a confirmed person’s track, the badge in its top right corner, and the settings panels to the right.#
How It Works#
The application detects motion in two ways at once. Fast motion, such as a person walking, is detected within each frame: the sensor sweeps the room many times per frame, and a person who moves between the sweeps stands out from everything that stays still. Slow motion, such as a person sitting still and breathing, is detected by comparing each frame with the preceding one, as a moving target indicator (MTI) does. Detections outside the detection volume or inside an exclusion zone are ignored. This is why the detection volume should end at the walls for best performance: reflections off the walls, people’s mirror images in them, and changes in a wall’s echo when a person blocks it are then outside the detection volume.
A tracker follows each target over time, so a person who stops moving keeps their track. A new track counts as motion until it behaves like a person: a walking person is confirmed within a couple of seconds, a person who sits down without walking first only after several seconds of consistent observations. Only confirmed people are counted and drawn.
A track that is no longer detected is kept for a while, so that a person sitting very still is not lost, and then removed: after about 2 s if the person was walking out of the detection volume, and after up to about 15 s if the person was standing or sitting still.
Adapting to Your Room#
The settings are in the panels to the right of the view, in the order described below. Change them while the measurement is stopped. Most panels have buttons to save their settings to a file and load them again, so that you can reuse them for the next measurement in the same room. The Sensor Installation, Detection Volume and Sensor Setup panels are shared with Motion Detection, whose Python API documents them as SensorInstallation, DetectionVolume and WallMountSessionAbstractionConfig.
Sensor Installation#
In this panel, enter how the sensor is mounted, see Mounting the Sensor.
- X rotation (tilt)
The angle by which the sensor is tilted, in degrees. Positive turns the sensor up, so a downward tilt is negative, e.g. -20°.
- Y rotation (roll)
180°, the default, for a board with the USB cable pointing down; 0° for the USB cable pointing up. Other values are not supported.
- Z rotation (pan)
The angle by which the sensor is turned to the side, in degrees. Positive turns the sensor to its left, i.e. counterclockwise as seen from above. Use it e.g. when the sensor is mounted in a corner pointing \(45^\circ\) from the walls.
- Mount height
The height of the sensor above the floor.
Detection Volume#
This panel sets the volume where people can be tracked.
- Box (world frame)
X bounds and Y bounds set the floor area to cover, in meters from the sensor, however it is tilted or turned: X bounds from side to side, positive to the right as seen from the sensor, and Y bounds into the room. Set both, or neither. Detections outside it are ignored, so where a bound is a wall, set it at the wall, with a margin of at least 10 cm, see How It Works. The bounds need not be walls: in an open area, they set the floor area to cover. The distance from the sensor to the far corners of the floor area, including mounting height, must not exceed 10 m.
- Range and angles (sensor frame)
Start and End limit the distance from the sensor. Without a box, set End, so that the detection volume has a far end. Where both the box and End limit the distance, the closer one applies.
Az angle range and El angle range set the field of view, to the sides and up and down, in degrees, in the sensor’s own directions. Wider ranges cover more of the room, but take longer to measure and use more power.
Presence Tracking Wall Mount#
This panel holds the processing settings, in the collapsed Advanced and Tracking groups. The defaults suit most rooms. Leave them at their defaults: other values are not tested, and can degrade detection and counting in ways that are hard to predict.
Exclusion Zones#
An exclusion zone is a circle on the floor where motion is ignored: no new track starts there, and a person’s track that enters a zone is held at its predicted position, as when the person is briefly not detected, and removed if the person stays in the zone. Use them for fixed sources of motion, such as a fan or a curtain, if needed to improve performance.
In the Exclusion zones panel, press Add exclusion zone and click in the 2D Heatmap where the zone should be; Esc or a click anywhere else cancels. Adjust each zone’s X, Y and Radius, in meters, or remove it, in the panel. Each zone is drawn as a circle in the 2D view and as a cylinder from the floor up in the 3D view. Exclusion zones are saved in recordings together with the detection volume.
Sensor Setup#
This panel adjusts the sensor parameters. The application derives the detailed sensor configuration from it, so that the signal quality is met across the detection area.
- Signal quality (dB)
The signal-to-noise ratio, for a standard reference reflector (0 dBsm), that the sensor setup is configured to reach at every point of the detection volume at SNR evaluation height. Higher values detect people more reliably, also at the far end and at the sides, but each measurement takes longer, which lowers the highest possible frame rate and increases power consumption.
- SNR evaluation height
The height above the floor at which Signal quality (dB) is met. The default, 1.2 m, is about the chest height of a person.
Leave the settings in the collapsed Advanced group at their defaults. In particular, the processing is tuned for the default frame rate, 8 Hz, and may not work as well at other frame rates. The Motion Detection page uses the same sensor setup and describes it in more detail.
Troubleshooting#
Start with the mounting and the detection volume; change the processing settings last.
The whole room cannot be covered:
The Detection Volume panel shows:
Warning
Detection volume too large for the set signal quality. Shrink the detection volume.
or the Sensor Setup panel:
Warning
Signal quality too high for the set detection volume. Decrease signal quality.
Narrow Az angle range and El angle range to the room. A narrower field of view reaches farther at the same signal quality.
Decrease End, if people need not be detected in the far corners.
Decrease Signal quality (dB).
People are missed, at the far end or at the sides of the room:
Check the mounting and the Sensor Installation panel: a downward tilt is negative, and the mount height should match.
Check that X bounds, Y bounds and Az angle range cover the whole room.
Increase Signal quality (dB).
Presence or motion is shown in an empty room:
Check that the sensor is mounted rigidly, see Mounting the Sensor.
Turn on Show detections and look in the 2D Heatmap where the detections are.
If they come from a fixed spot, such as a fan or a curtain, add an exclusion zone around it.
If they lie at or beyond a wall, move the bound in so that the wall is outside the detection volume.
A person sitting still is lost:
Increase Signal quality (dB).
Limitations#
Maximum range: 10 m from the sensor (an application limit).
Closer than about 1 m to the sensor (in distance, not on the floor), positions are inaccurate.
The board must be mounted with the USB cable pointing straight down or straight up.
Moving objects, such as plants, curtains or fans, show as Motion Detected and can be detected as presence. Place an exclusion zone around a fixed source.
People inside an exclusion zone are not tracked.
A person hidden behind another person or an object, as seen from the sensor, can be missed.
A track’s height is the height of its strongest reflection, not the person’s height.
Verification#
The application has been tested in the scenarios below. Each page describes the room, the sensor mounting and the test procedure, and shows the results.
In a conference room with a standing fan running, presence was detected 99.8 % of the time someone was in the room, on average 1.7 s after the first person entered, and never in 48 h of the empty room. The number of people was right 89 % of the time, and within one person 99.4 % of the time. In an open lunch area, presence was detected 99.9 % of the time, and the count was right 85 % of the time and within one person 99.8 % of the time. A person standing still was detected in 98.4 % of the visits to the cells of an 8 × 6 m grid, and in every visit to 46 of its 48 cells. These are the results of these tests, not a performance guarantee: in another room, or with another mounting, configuration or scenario, results may differ.
Up to five people enter a conference room one at a time, sit down and leave again, with a standing fan running the whole time.
Two or three people walk into an open lunch area and stand talking while a passer-by walks through, with a desk fan running the whole time.
A person stands still in each cell of an 8 × 6 m grid in turn, in four runs, to map where in the room the sensor detects them.