Cargo#
Introduction#
This Example Application demonstrates how to utilize the Distance Detector and the Presence Detector for detecting the utilization level in a container as well as detecting whether a person is present in the container or not. The algorithms are optimized for three different container sizes 10 feet (3 m), 20 feet (6 m), and 40 feet (12 m). The user can decide if only one of the algorithms should be activated or to use both. If both detectors are used, the application alternates between measuring distance and measuring presence. To get an accurate presence estimate, the algorithm needs to run for a few seconds. This burst time is set to five seconds. Hence, each time the Presence Detector is activated, it measures for five seconds. From the utilization level part of the Example Application, the output is the distance to the cargo as well as the utilization level in meters and in percentage. The presence part outputs if presence is detected or not.
Your First Measurement#
In this section, you will find the information needed to make your first measurement with the Cargo Example Application.
Exploration Tool#
The Cargo Example Application is best evaluated with one of our Evaluation Kits together with the Exploration Tool application. Follow the steps in Getting started to get it up and running.
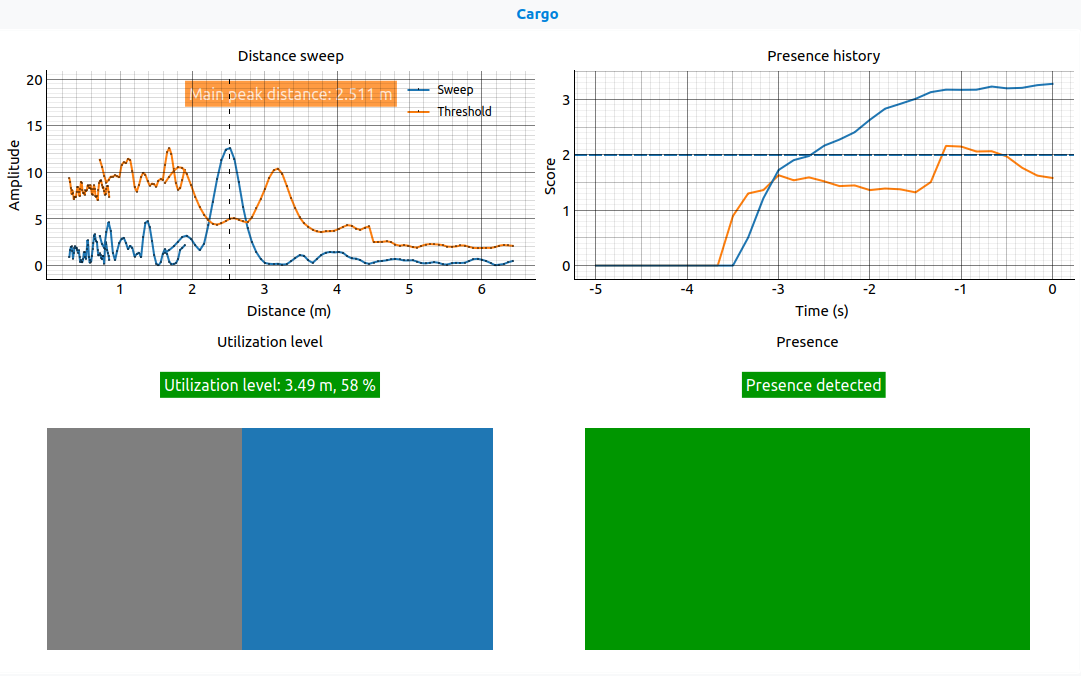
Select Cargo in the left hand side menu. The default configuration is the No lens preset, which has a higher signal quality and lower thresholds compared to the other presets. This is to get a good user experience when first testing the application in an open space with no lens. For testing in a container, we recommend using a lens (please contact Acconeer for more information) and one of the presets for 10 feet, 20 feet or 40 feet, see Physical Integration and Presets. Per default, only the utilization level detection is activated. However, it is only to tick the activate presence check box to get presence running as well. If both detectors are activated, there will be four plots in the GUI. The upper left plot shows the distance sweep measured for utilization level detection. The lower left plot shows an illustration of the container and visualizes the utilization level in the container. Presence is shown in the right plots. The upper plot shows the presence scores for inter frame presence and intra frame presence together with the respective thresholds. The lower right plot visualizes if presence is detected or not in the container.
Configuration#
This section outlines how to configure the Cargo Example Application in common scenarios.
Presets#
The Cargo Example Application has four predefined presets available:
- 10 feet (3 m)
This preset is optimized for a container with 10 feet (3 m) length.
- 20 feet (6 m)
This preset is optimized for a container with 20 feet (6 m) length.
- 40 feet (12 m)
This preset is optimized for a container with 40 feet (12 m) length.
- No lens
This preset is for demo purposes in an open space without a lens.
Only utilization level is activated in the presets. However, the presence detector is also configured for each preset and can be activated by the user. All settings in the presets are set with an aim of low power consumption together with a good user experience during initial testing. This means that the burst and update rates are set higher than typical end-product levels and can be reduced to save power.
Further Configuration#
- Activation of Detectors
Utilization Level - The utilization level detection is activated with the
activate_utilization_levelparameter.Presence Detection - Presence detection is activated with the
activate_presenceparameter. The presence detector measures for five seconds in each burst, which means that the maximum burst rate is 0.2 Hz. If the maximum burst rate is used and utilization level detection is activated, there will be maximum one frame measured for utilization level between the bursts even if the update rate is set higher. After each burst, the presence detector restarts, and the presence scores start from zero.- Adjusting for Decreased Power Consumption
Utilization Level - In the presets, the
update_rateparameter is set quite high to get good response for initial testing. To lower power consumption, a much lower update rate could be used. It is possible to lower thesignal_qualityparameter to decrease power consumption as well. Due to limited cargo variation in the testing of this application, the default is set to 10 to have margin for less reflective materials. In our tests we used a flat plywood board facing the radar, see Test Results.Presence Detection - Decreasing the
burst_rateis the best way to lower power consumption for presence detection. This only affects the interval of the results and not the performance for each presence burst. Theupdate_rateandsweeps_per_framecould also be decreased, but this will affect performance. The same thing applies forsignal_quality, the trade off is performance versus power consumption.- Adjusting Thresholds
Since a container is made out of metal, which is highly reflective, the presence score in an empty container is higher compared to in an open space. Due to this, the thresholds for both utilization level and presence detection are set very high. With good physical integration, see Physical Integration, this might be improved, and the thresholds could be decreased to improve performance. The thresholds are adjusted with the
threshold_sensitivityparameter for utilization level andinter_detection_thresholdtogether withintra_detection_thresholdfor the presence detection.- Setting the Measurement Range
The measurement range is set through the
container_sizeparameter. There are three sizes to choose from, 10 feet (3 m), 20 feet (6 m) and 40 feet (12 m).- Predefined Configurations
The Cargo Example Application utilizes both the Distance Detector and the Presence Detector. Some settings are predefined for both detectors to optimize performance for detection in a container. These cannot be changed. For the Distance Detector, these includes:
For the Presence Detector, these includes:
automatic_subsweeps= Trueinter_frame_fast_cutoff=update_rate(no filtering)inter_frame_presence_timeout= None
For the settings that are not mentioned, the default values are used.
Physical Integration#
A container is made of metal, which is highly reflective for radar signals. The signals bounce around and create a higher noise floor compared to open space. Due to this, all unwanted side reflections should be minimized with respect to integration. A lens is preferred to narrow down the beam and increase measurement range. Please contact Acconeer for more information about the lens suitable for this application. The position of the radar is preferably as centered as possible, at around 70 cm height in one of the container door’s indentations.
Calibration#
This Example Application does not have any calibration of its own. However, since it uses the Distance Detector in the background, there will be some calibrations when starting the application. Due to the predefined configuration of the Distance Detector, it is the Noise Level Estimation and the Offset Compensation that is performed. See Detector Calibration for more information.
Burst Rate and Timing#
To get a good estimate of the presence detection, the Presence Detector measures for five seconds in a row before possibly switching to the Distance Detector.
This means that the update_rate set for the presence detector controls the update rate within the burst.
The measuring interval between the presence bursts is adjusted with the burst_rate parameter.
Since the burst is five seconds long, the maximum burst rate is 0.2 Hz.
When the presence burst is not running, the time can be used to measure with the Distance Detector. In Exploration Tool, the update rate of the Distance Detector can be set independently of the presence burst rate. This means that the Distance Detector will measure as many frames as it can before it is time for a new presence burst, i.e., there could be a small drift in the presence burst rate if the measurement time does not add up perfectly with the presence detection gap. This does not affect the presence performance, since there is no filtering between presence bursts.
When only presence detection is active or when the burst rate of the presence detection is higher compared to the update rate of the utilization level measurement, the sensor will be measuring in the update_rate frequency of the presence detector even if it is between bursts.
This is to keep pace when switching detectors in the Python Exploration Tool implementation.
Example App Output#
The mode in the result indicates if the result belongs to a presence measurement or a distance measurement.
If the result is from a presence measurement, the mode will be set to presence and all results relevant to distance will be set to None.
The presence_detected will be true if presence is detected and false otherwise.
If the result is from a distance measurement, the mode will be set to distance and all results based on the presence detector will be set to None.
The distance is the actual distance measured,
while level_m is the utilization level in meters from the back of the container.
The level_percent is the utilization level converted to percentage.
Algorithm Signal Processing#
The algorithm uses the Distance Detector and the Presence Detector. Check out their respective documentation pages for more information.
Test Results#
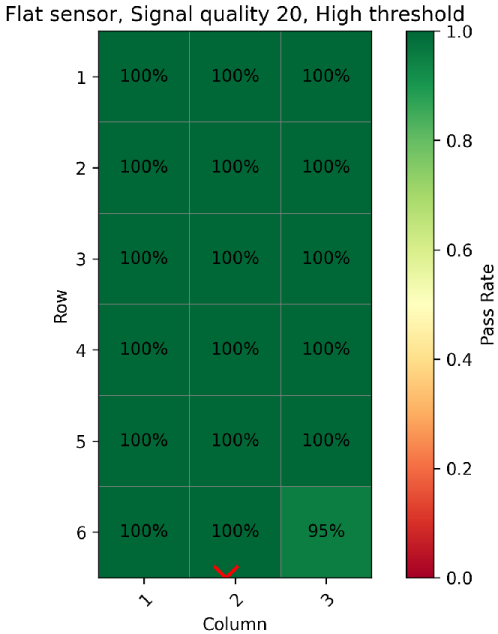
The tests were performed in a 20-foot container. Two different setups were tested, both using lens:
Sensor placed flat on about 70 cm height on the door.
Sensor placed at an angle at the top of the door.
Utilization Level
Utilization level was tested using a plywood board as cargo at different distances. For each distance, 30 frames were measured. The detection score was calculated as the percentage of the frames that correctly detected the distance. It is concluded that the flat sensor outperforms the angled one. The angled sensor does not detect the plywood board when the distance becomes closer than 4 m to the sensor, as seen in the table below.
Sensor position |
Detection score 2 m |
Detection score 3 m |
Detection score 4 m |
|---|---|---|---|
Flat |
100% |
100% |
100% |
Angled |
0% |
0% |
100% |
Presence Detection
Presence detection was tested with a person standing in different positions inside the container, creating a detection grid. For each position, the detection score was calculated as the percentage of correctly detected frames. To avoid false detections due to the high noise floor, the thresholds were set to 4 for inter presence and 2.75 for intra presence. A two second long transient of no detection in the beginning was allowed per position. With these conditions, a detection rate of roughly 100% was almost established. The performance can be seen in the figure below, where the sensor placement is illustrated with a red “v”.
Exploration Tool Python API#
Example Application Configuration#
- class acconeer.exptool.a121.algo.cargo._ex_app.ExAppConfig(*, activate_presence: bool, cargo_presence_config: CargoPresenceConfig | None = NOTHING, activate_utilization_level: bool, utilization_level_config: UtilizationLevelConfig | None = NOTHING, container_size: ContainerSize = ContainerSize.CONTAINER_20_FT)#
- activate_presence: bool#
Activates presence detection.
- cargo_presence_config: CargoPresenceConfig | None#
Configuration of presence detector.
- activate_utilization_level: bool#
Activates utilization level detection.
- utilization_level_config: UtilizationLevelConfig | None#
Configuration for utilization level measurements.
- container_size: ContainerSize#
Container size. Sets the detection range for utilization level detection and for presence detection.
- class acconeer.exptool.a121.algo.cargo._ex_app.UtilizationLevelConfig(*, update_rate: float = 5, signal_quality: float = 10, threshold_sensitivity: float = 0)#
- update_rate: float#
Sets the detector update rate.
- signal_quality: float#
Signal quality (dB).
High quality equals higher HWAAS and better SNR but increases power consumption.
- threshold_sensitivity: float#
Sensitivity of threshold.
High sensitivity equals low detection threshold, low sensitivity equals high detection threshold.
- class acconeer.exptool.a121.algo.cargo._ex_app.CargoPresenceConfig(*, burst_rate: float = 0.1, update_rate: float = 6.0, signal_quality: float = 20, sweeps_per_frame: int = 12, inter_detection_threshold: float = 4, intra_detection_threshold: float = 2.75)#
- burst_rate: float#
Sets the presence burst range in Hz. Each burst is 5 s long, hence 0.2 Hz is the highest possible burst rate.
- update_rate: float#
Update rate in Hz.
- signal_quality: float#
Signal quality metric (higher = better signal, lower = less power consumption).
- sweeps_per_frame: int#
Number of sweeps per frame.
- inter_detection_threshold: float#
Detection threshold for the inter-frame presence detection.
- intra_detection_threshold: float#
Detection threshold for the intra-frame presence detection.
Example Application Result#
- class acconeer.exptool.a121.algo.cargo._ex_app.ExAppResult(*, mode: _Mode, presence_detected: bool | None, inter_presence_score: float | None, intra_presence_score: float | None, distance: float | None, level_m: float | None, level_percent: float | None, distance_processor_result: List[DistanceProcessorResult] | None, service_result: Result)#
- mode: _Mode#
Measurement mode, Presence or Distance.
- presence_detected: bool | None#
True if presence was detected, False otherwise.
- inter_presence_score: float | None#
A measure of the amount of slow motion detected.
- intra_presence_score: float | None#
A measure of the amount of fast motion detected.
- distance: float | None#
The measured distance by the distance detector.
- level_m: float | None#
The utilization level in m.
- level_percent: float | None#
The utilization level in percentage.
- distance_processor_result: List[ProcessorResult] | None#
Distance processor result, used for plotting.