Adding your own algorithm module#
At some point you may want to write your own example for your algorithm and use the Exploration Tool App to test and tune it. We will need to do the following steps:
Creating an algorithm module: This is where almost all coding happens
Module import for the App: Tell the App to import your algorithm module
We will cover these steps in the following sections.
Note
This requires you to download the source code of Exploration Tool, via git or as a .zip file.
Creating an algorithm module#
In this example we will create a toy algorithm, where we will plot Envelope frames in in Exploration Tool. We will also be able to change the color of the plot and scale the data by some settable factor.
The toy algorithm module#
Create a new file in the src/acconeer/exptool/a111/algo/ folder.
You can copy-paste the example below and name it something nice; like my_algorithm_module.py for example.
  1# Copyright (c) Acconeer AB, 2022
  2# All rights reserved
  3
  4# my_algorithm_module.py
  5
  6from enum import Enum
  7
  8import pyqtgraph as pg
  9
 10import acconeer.exptool as et
 11from acconeer.exptool.a111.algo import ModuleFamily, ModuleInfo
 12
 13
 14class MySensorConfig(et.a111.EnvelopeServiceConfig):
 15    """Defines default sensor config and service to use"""
 16
 17    def __init__(self):
 18        super().__init__()
 19        self.profile = et.a111.EnvelopeServiceConfig.Profile.PROFILE_1
 20        self.range_interval = [0.1, 0.5]  # in meters
 21        self.running_average_factor = 0.01
 22        self.maximize_signal_attenuation = True
 23        self.update_rate = 60
 24        self.gain = 0.2
 25        self.repetition_mode = et.a111.EnvelopeServiceConfig.RepetitionMode.SENSOR_DRIVEN
 26
 27
 28class MyProcessingConfiguration(et.configbase.ProcessingConfig):
 29    """
 30    Define configuration options for plotting and processing.
 31    The GUI will populate buttons and sliders for
 32    all parameters defined here. Check the other detectors for examples!
 33    """
 34
 35    VERSION = 1
 36
 37    class PlotColors(Enum):
 38        ACCONEER_BLUE = "#38bff0"
 39        WHITE = "#ffffff"
 40        BLACK = "#000000"
 41        PINK = "#f280a1"
 42
 43    plot_color = et.configbase.EnumParameter(
 44        label="Plot color",
 45        enum=PlotColors,
 46        default_value=PlotColors.ACCONEER_BLUE,
 47        updateable=True,
 48        order=10,
 49        help="What color the plot graph should be",
 50    )
 51
 52    scale = et.configbase.FloatParameter(
 53        label="Scale",
 54        default_value=1.0,
 55        decimals=3,
 56        limits=[0.001, 1.0],
 57        updateable=True,
 58        order=20,
 59        help="Allows you to scale the incoming envelope by a factor",
 60    )
 61
 62
 63class MyNewProcessor:
 64    """Processor class, which should do all the processing in the example."""
 65
 66    def __init__(self, sensor_config, processing_config, session_info, calibration=None):
 67        self.scale = processing_config.scale
 68
 69    def update_processing_config(self, processing_config):
 70        """This function is called when you change sliders or values in the GUI"""
 71
 72        self.scale = processing_config.scale
 73
 74    def process(self, data, data_info):
 75        """
 76        This function is called every frame and should return the `dict` out_data.
 77        """
 78
 79        scaled_data = self.scale * data
 80        out_data = {"scaled_data": scaled_data}
 81        return out_data
 82
 83
 84class MyPGUpdater:
 85    """This class does all the plotting."""
 86
 87    def __init__(self, sensor_config, processing_config, session_info):
 88        self.plot_color = processing_config.plot_color.value
 89        self.data_length = session_info["data_length"]
 90
 91    def setup(self, win):
 92        """
 93        This function sets up all graphs and plots. Check the other
 94        detectors and examples to see how to initialize different
 95        types of graphs and plots!
 96        """
 97        win.setWindowTitle("My new example")
 98
 99        self.my_plot = win.addPlot(title="My Plot")
100        self.my_plot.setMenuEnabled(False)
101        self.my_plot.setMouseEnabled(x=False, y=False)
102        self.my_plot.hideButtons()
103        self.my_plot.addLegend()
104        self.my_plot.showGrid(x=True, y=True)
105        self.my_plot.setXRange(0, self.data_length)
106        self.my_plot.setYRange(0, 100)
107
108        self.my_plot_curve = self.my_plot.plot(
109            pen=pg.mkPen(self.plot_color, width=2),
110            name="Envelope signal",
111        )
112
113    def update_processing_config(self, processing_config=None):
114        """This function is called when you change sliders or values in the GUI"""
115
116        self.plot_color = processing_config.plot_color.value
117        self.my_plot_curve.setPen(self.plot_color, width=2)
118
119    def update(self, out_data):
120        """
121        This function is called each frame and receives the dict `out_data` from `MyProcessor`.
122        """
123        data_from_my_processor = out_data["scaled_data"]
124        self.my_plot_curve.setData(data_from_my_processor)
125
126
127my_module_info = ModuleInfo(
128    key="my_algorithm_module",
129    label="My Algorithm Module",
130    module_family=ModuleFamily.EXAMPLE,
131    multi_sensor=False,
132    docs_url=None,
133    pg_updater=MyPGUpdater,
134    processing_config_class=MyProcessingConfiguration,
135    sensor_config_class=MySensorConfig,
136    processor=MyNewProcessor,
137)
The ModuleInfo is what is sent to the App.
If your my_algorithm_module.py file defines a valid ModuleInfo, the App
will populate buttons and settings automatically for you.
Note
ModuleInfo accept classes, not instances:
processor=MyNewProcessor,    # <- Correct!

processor=MyNewProcessor(),  # <- Wrong!
Multi-sensor support#
There are three options for handling multi-sensor support:
Do not allow multiple sensors –> set
mutli_sensor = FalseAllow multiple sensors –> set
mutli_sensor = TrueUse a wrapper (multiplies graphs and plots, when you select more than one sensor). Basic wrappers for your
Processor- andPGUpdaterclasses are defined in acconeer.exptool.a111.algo.utils.Define plots and graphs for individual sensors in your processor
Note about file structure#
We at Acconeer have split up this file in multiple files and put those files in a folder. This is not necessary to do for your first example, but if you want to look at how we have done things, you can find the corresponding classes and functions in the following places:
File |
Class/Function |
|---|---|
|
|
|
|
|
|
You might come across some other files as well, but they are not important for now.
Module import for the App#
The App only needs to import your ModuleInfo, which we have called my_module_info for this example.
Import your newly created file in src/acconeer/exptool/app/elements/modules.py file, which defines the services and detectors loaded into the App, to include the new algorithm module.
 import acconeer.exptool.a111.algo.breathing._meta as breathing_meta
 import acconeer.exptool.a111.algo.button_press._meta as button_press_meta

 ...

 from acconeer.exptool.a111.algo import my_algorithm_module

 MODULE_INFOS = [
     envelope_meta.module_info,
     iq_meta.module_info,

     ...

     my_algorithm_module.my_module_info,
 ]

 ...
Note
Unless you have an editable install of Exploration Tool, you will need to reinstall after editing modules.py
That’s it! Now, lets have a look at what we have accomplished.

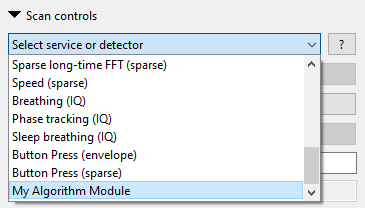
If we take a look at the Scan controls section, press the drop-down and scroll all the way down. We should see My Algorithm Module appear.
Select it, and start a new measurement. Voila!