Parking Reference Application#
Introduction#
This Reference Application demonstrates how the A121 sensor can be used as a parking sensor. The sensor can be mounted either on the ground or on a pole, within or near a parking space. This Reference Application indicates whether a car is parked in the designated space while maintaining low power consumption. This Reference Application also includes a component called Obstruction Detection. The purpose of this component is to identify if something is blocking the sensor, which could interfere with parking detection.
Your First Measurement#
In this section you will find the information needed to make your first measurement with the Parking Reference Application.
Exploration Tool#
To evaluate parking detection with the Acconeer radar, we recommend that you start with one of our Evaluation Kits and the Exploration Tool application.
After the steps in Getting started have been done, press Parking in the left hand side menu and then press the Calibrate button followed by Start measurement. With the default settings, the radar will search for a parked car in the interval of 0.1 m to 0.4 m with an update rate of 0.1 Hz. To get a faster response from the sensor while trying out the application you can increase the update rate to, for example, 5 Hz. If you place a stationary object approximately 20 cm from the sensor, the Parking Reference Application should report it as a parked car. If you place an object straight onto or very close to the sensor the Parking Reference Application should output Obstruction detected.
Since the default settings have the obstruction detection activated, the GUI shows three plots, as shown in Figure 23. If the obstruction detection is deactivated, we would only see two plots in the GUI.
The main plot, called Sampled Signatures, shows the signature history and their location in the 2D space. If a car is detected, two lines indicating the range for which the object signature must be within to be considered the same object. If a large enough fraction of signatures is above the threshold and within the range, detection is triggered and indicated.
The secondary plot, called Noise adjusted amplitude shows the amplitude levels after normalizing against an approximation of the noise level and adjusting with the range. This is the input to each signature calculation. You can read more about the algorithm in the section Algorithm Signal Processing
The obstruction plot is only shown when the obstruction detection is activated. This plot shows the amplitude data for the region that the obstruction detection is active in as well as the signature of the displayed data as an orange point. In addition, the signature of the calibration data is also shown together with a bounding box based on the distance threshold. If the orange point moves outside the box, the obstruction detection will trigger.
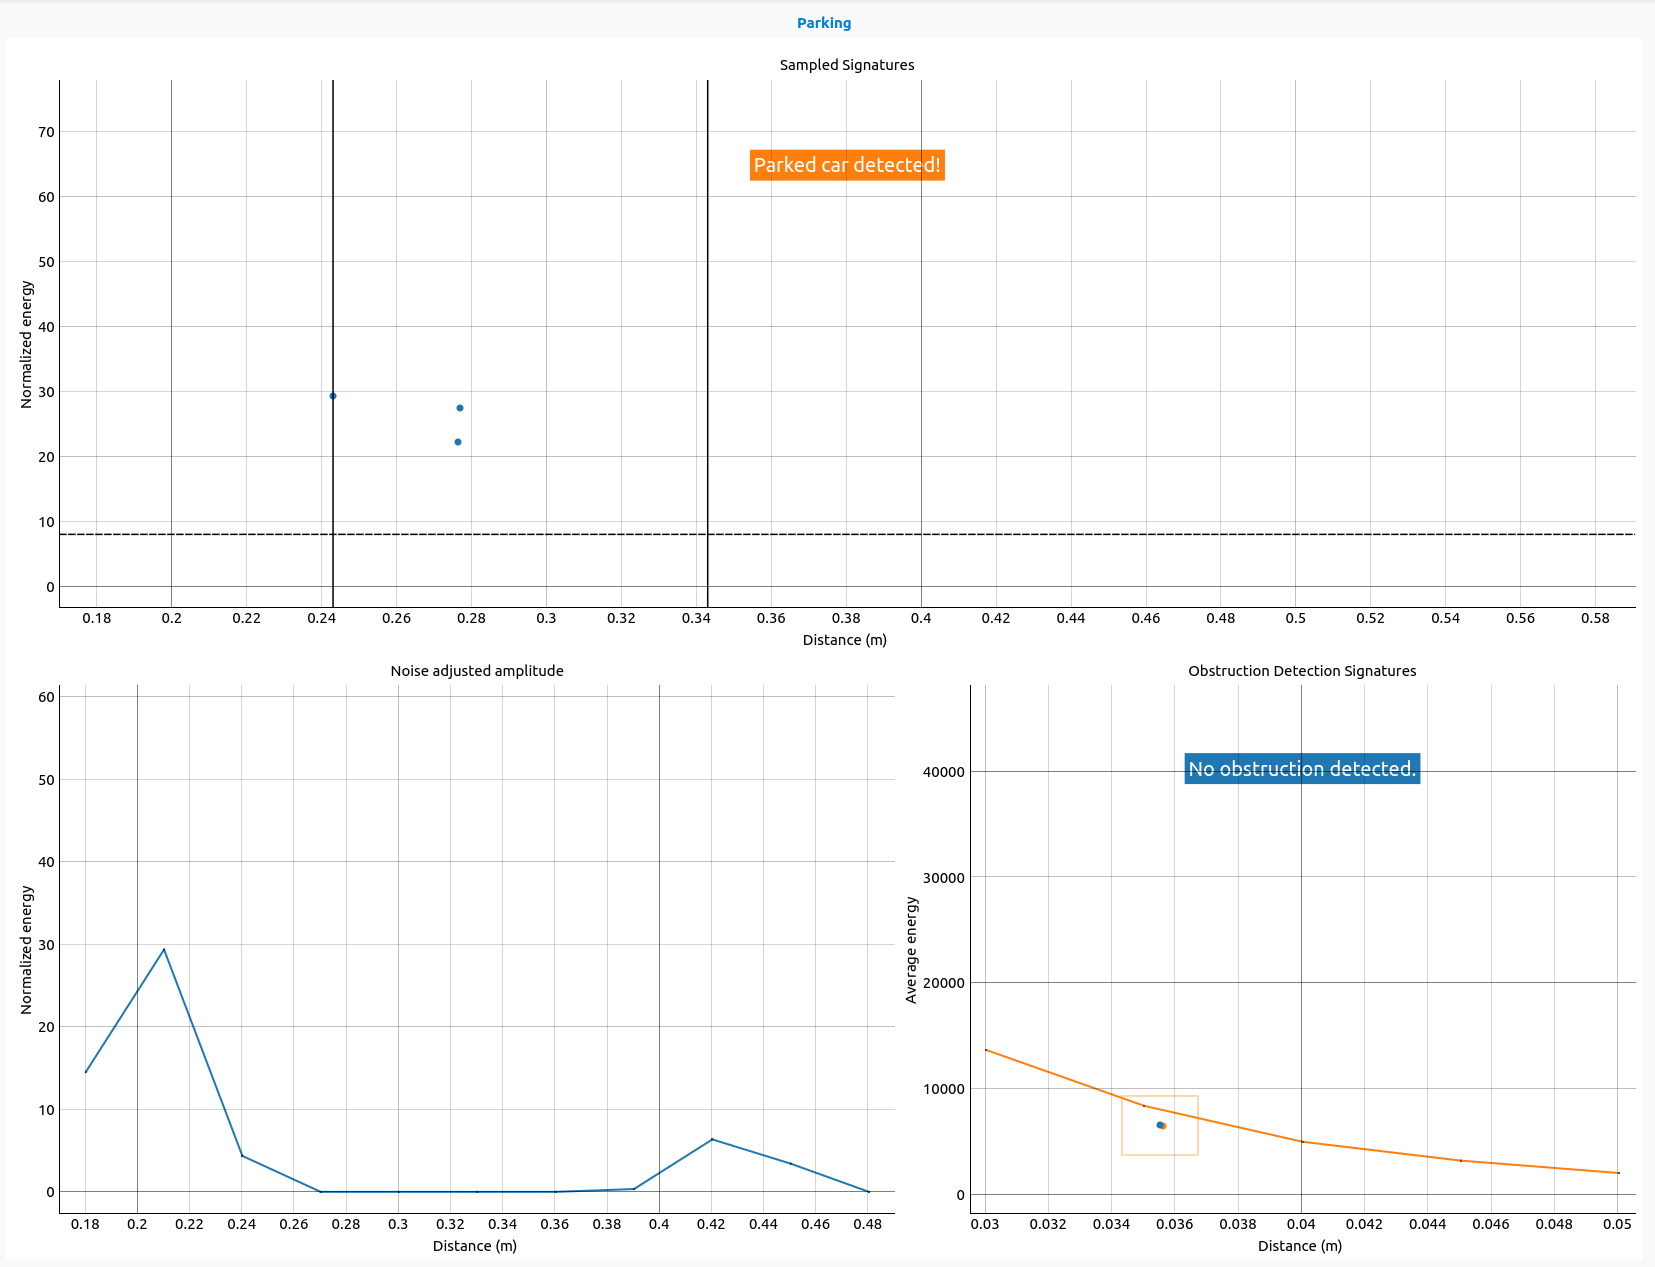
Figure 23 Example of the parking GUI with obstruction detection active. A parked car is reported and the reported object has been seen for three frames (which is indicated that you have three dots above the threshold).#
Embedded C#
An embedded C application is provided in the Acconeer SDK, available at the Acconeer Developer Site.
The embedded application use the same default configuration as Exploration Tool. By default, it prints the result using printf which usually is connected to stdout or a debug UART, depending on environment. The application is provided in source code.
Configuration#
This section outlines how to configure the Parking Reference Application in common scenarios.
Presets#
The Parking Reference Application has two predefined configurations, available in the application as presets, with the following purposes:
- Ground
This preset is suitable for scenarios where the sensor is located close to the car, typically for ground-mounted or curb-mounted parking sensors. The update rate of this preset is set to 0.1 Hz to maintain low power consumption, as many ground-mounted parking sensors are battery-powered and do not require a fast response time.
- Pole
This preset is suitable for use cases where the sensor observes the car from a longer range, typically found in pole-mounted parking sensors that view the car from the side or slightly downward. This preset features a higher update rate compared to the ground-mounted preset, as many pole-mounted parking sensors are connected to the power grid. Additionally, the higher update rate helps make the detection less sensitive to interruptions, such as when a person walks between the car and the pole.
These presets are available both in the Exploration Tool application and in our C example. They should be viewed as a starting points, from where a more tailored configuration can be developed.
Further Configuration#
This section describes further configurations that can be made to tailor the application to your use case.
- Setting the Measurement Range
Adjustments to the measurement range can be done by changing the range settings (
range_start_mandrange_end_m). These determine the approximate range from the sensor wherein you expect to find a part of a car. Note that it is detrimental to the performance to let the range be to close to the sensor, it is not recommended to set therange_start_mcloser than the direct leakage allows. This is constricted in Exploration Tool application and API.- Obstructed Sensor
If an object is blocking the sensor, even if the start of the measurement range is set beyond it, it will affect the signal and it might also affect the sensor’s ability to detect a parked car. For some use cases it is important to know if the sensor is obstructed or not and in these cases one can enable the Obstruction Detection component of the Parking Reference Application. You can read more about how this part of the algorithm works in Obstruction Detection.
- Setting the Update Rate
The main factor behind the energy consumption for this Reference Application is the update rate. For a battery driven application it is therefore beneficial to set the update rate as low as the use case will allow to prolong the battery life of the device.
Physical Integration#
This use case is highly dependent on the integration, both for the obstruction detection and the primary parking detection. All notes here should be taken as general guidelines.
In the pole mounted case (when the sensor looks at the car from the side) there are a few issues found in testing. Since a car hood often consists of large flat surfaces which can deflect the signal instead of reflecting it, there is a risk that a car can appear “invisible” to the sensor. The most natural way to mitigate this issue is to tilt the sensor slightly downwards, which often catches the front of the car, which more often than the hood has reflective surfaces more perpendicular to the sensor. All pole mounted tests were performed with the sensor angled slightly downwards, see Figure 25 and Figure 24.
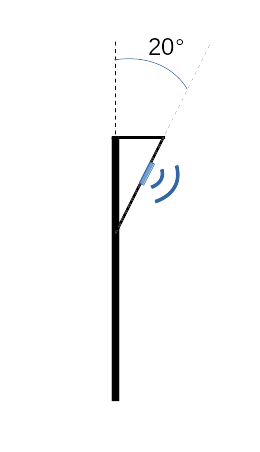
Figure 24 Illustration of the sensor mount with angle used in testing the pole mounted case.#
For the ground mounted case, the sensor should be looking straight up and be placed as central (under the car) as possible. A common issue is that the casing creates some reflections within the closer parts of the detection range, which in turn can cause false detects.
This can be mitigated by either adjusting the start of the range (recommended) or adjusting the amplitude_threshold. Adjusting the amplitude_threshold can impact detection performance.
Another caveat is to set the range too far from the sensor, so that the start of the range is inside the car. This can cause the object to be missed, since the signal will reflect on the bottom of the car and travel too far in the allotted time. So the start of the range should be kept as low as possible while not encountering problems with the integration. The best way to achieve this is by testing using Exploration Tool.
Calibration#
There are two types of calibration to consider for this application, for normal usage, where only the parking detection part of the application is used, and an additional for when obstruction detection is used. Both calibrations are done at start-up, but the obstruction detector can require regular re-calibration.
- Parking Detection
The calibration for the parking detection part of the application is done with the TX antenna turned off, so there is no dependence on what is in front of the sensor at time of calibration. It can be thought of as part of the start-up sequence without any operator requirements. The algorithm has an internal model to compensate for the temperature fluctuations in the environment which otherwise would impact the data, so after the calibration has finished, there is no need for additional calibration unless the power is dropped.
- Obstruction Detection
For obstruction detection functionality, stricter calibration requirements apply. The obstruction calibration analyzes the range close to the sensor while transmitting pulses, thus no object (except a potential casing) can be present within 10 cm of the sensor during this calibration, when using the default configuration for obstruction detection. The obstruction detection range can be configured and in that case no object can be present within the obstruction detection range plus an additional margin of approximately 5 cm. In addition, optimal performance requires calibration under conditions close to normal operation, meaning that the sensor needs to be installed into its intended geometry. This is not required for the regular parking detection functionality, only for the obstruction detection. If the obstruction detector is activated and the temperature is estimated to deviate more than 20 degrees, it is recommended to re-calibrate the obstruction detector.
Reference Application Output#
The reference application will provide one or two main output: detection and if activated, obstruction. The parking detection output will be True if the algorithm detects a car in the range and False otherwise. The obstruction detection will output True if the algorithm detects an obstruction of the sensor. If the obstruction detection is not activated in the configuration, this will always be False.
In addition, the Reference Application provides detailed information that is mainly used for plotting, but can of course be used for other purposes within your application. This result is only available in the Exploration Tool API and not in the embedded implementation for a microcontroller.
Algorithm Signal Processing#
This algorithm has an intended use of determining whether a stationary car is present in front of the sensor as well as maintaining a low power consumption. The main idea is that a large stationary object will reflect a similar amount of energy at the same distance over time, whereas a moving object (like a human) will have a more varied reflection. To achieve this detection, we introduce a measurement, called “signature” of the sweep. The signature is calculated so that a small change in amplitude or depth of the reflection will create a small change in the signature. So two signatures that are close to each other will also correspond to similar reflected energy and thus likely the same object. The algorithm proceeds to collect signatures over time and determine if a certain number of signatures are close to each other.
The measurement used for this algorithm is similar in nature to the measurement of the distance detector, which also detects (and reports distance to) static objects. However, this configuration is tailor made for the parking use case and designed with a power constraint in mind.
The signatures are calculated from the mean sweep over a frame. For all sweeps, we only use the amplitude measurements for each depth, denoted with \(A(d)\) (which is obtained by taking the absolute value of the Sparse IQ data). The phase information is not used in this reference application. See Frames, sweeps and subsweeps for more information about frames and sweeps.
Signature#
The signature concept mentioned here and used in the algorithm is a 2D measure on the amplitude data of the whole sweep. It differs slightly between the obstruction detection and the normal parking detector by taking the average amplitude over the whole sweep in the obstruction case while taking the max amplitude in the parking detection case. Here WD denotes “Weighted Distance”.
So for the parking case, the signature \(S_p\), is obtained by:
And for the obstruction detection, the signature \(S_o\):
For the parking case, the measurement is not necessarily continuous. But in practice, small changes in amplitude tends to result in small changes in the signature, which is the relevant property used for the algorithm.
Obstruction Detection#
The Obstruction Detection component of this Reference Application measures few points very close to the sensor, within the so-called direct leakage. An obstruction will alter the received direct leakage and/or returned signal, causing a change in the data signature. The obstruction detection feature allows the user to configure both the sensitivity and the range of the processing. Since the amplitude is sensitive to temperature fluctuations, it is recommended to test the threshold under conditions appropriate to the use case. If the obstruction detection feature is used, it is important to ensure that the range of obstruction detection does not overlap with the range for parked car detection.
Calibration#
As stated in previous sections both the parking detection part of this application and the obstruction detection part needs to be calibrated. The parking detection part uses an estimation of the underlying noise level to calculate when an object is in front of it. The calibration is necessary to estimate this noise level. The noise level is mainly dependent on the temperature, so the calibration not only stores the noise level, but also the temperature measured by the sensor at the time of calibration. The algorithm automatically compensates for the change in the environment temperature which is the reason why this calibration is only necessary to do at start-up.
However, the calibration for obstruction detection requires measurements where both transmission and reception of pulses are used to characterize the direct leakage. Since direct leakage varies with temperature and the algorithm does not compensate for this, it is recommended to recalibrate when the temperature is estimated to deviate by more than 20 degrees from the original calibration temperature.
Memory and Power Consumption#
In this section you can find the RAM memory usage and power consumption for the embedded C application.
Memory#
The table below shows approximate RAM for the embedded C application using an XM125 for the two presets.
RAM |
Ground (kB) |
Pole (kB) |
|---|---|---|
Static |
1 |
1 |
Heap |
5 |
7 |
Stack |
2 |
2 |
Total |
8 |
10 |
Power Consumption#
The table below shows the average current in mA using an XM125 for the two presets.
Ground (mA) |
Pole (mA) |
|---|---|
0.075 |
1.075 |
Test Results#
Three different cases have been tested: Ground, Pole and Curb mounted.
The pole mounted case intends to simulate when the sensor is mounted inside an electric charging station or similar where the sensor is looking at the car from the front (or back), either at an angle or direct ahead. A preset for the pole mounted case can also be found among the presets in Exploration tool. This case was tested with an FZP lens, see Figure 25.
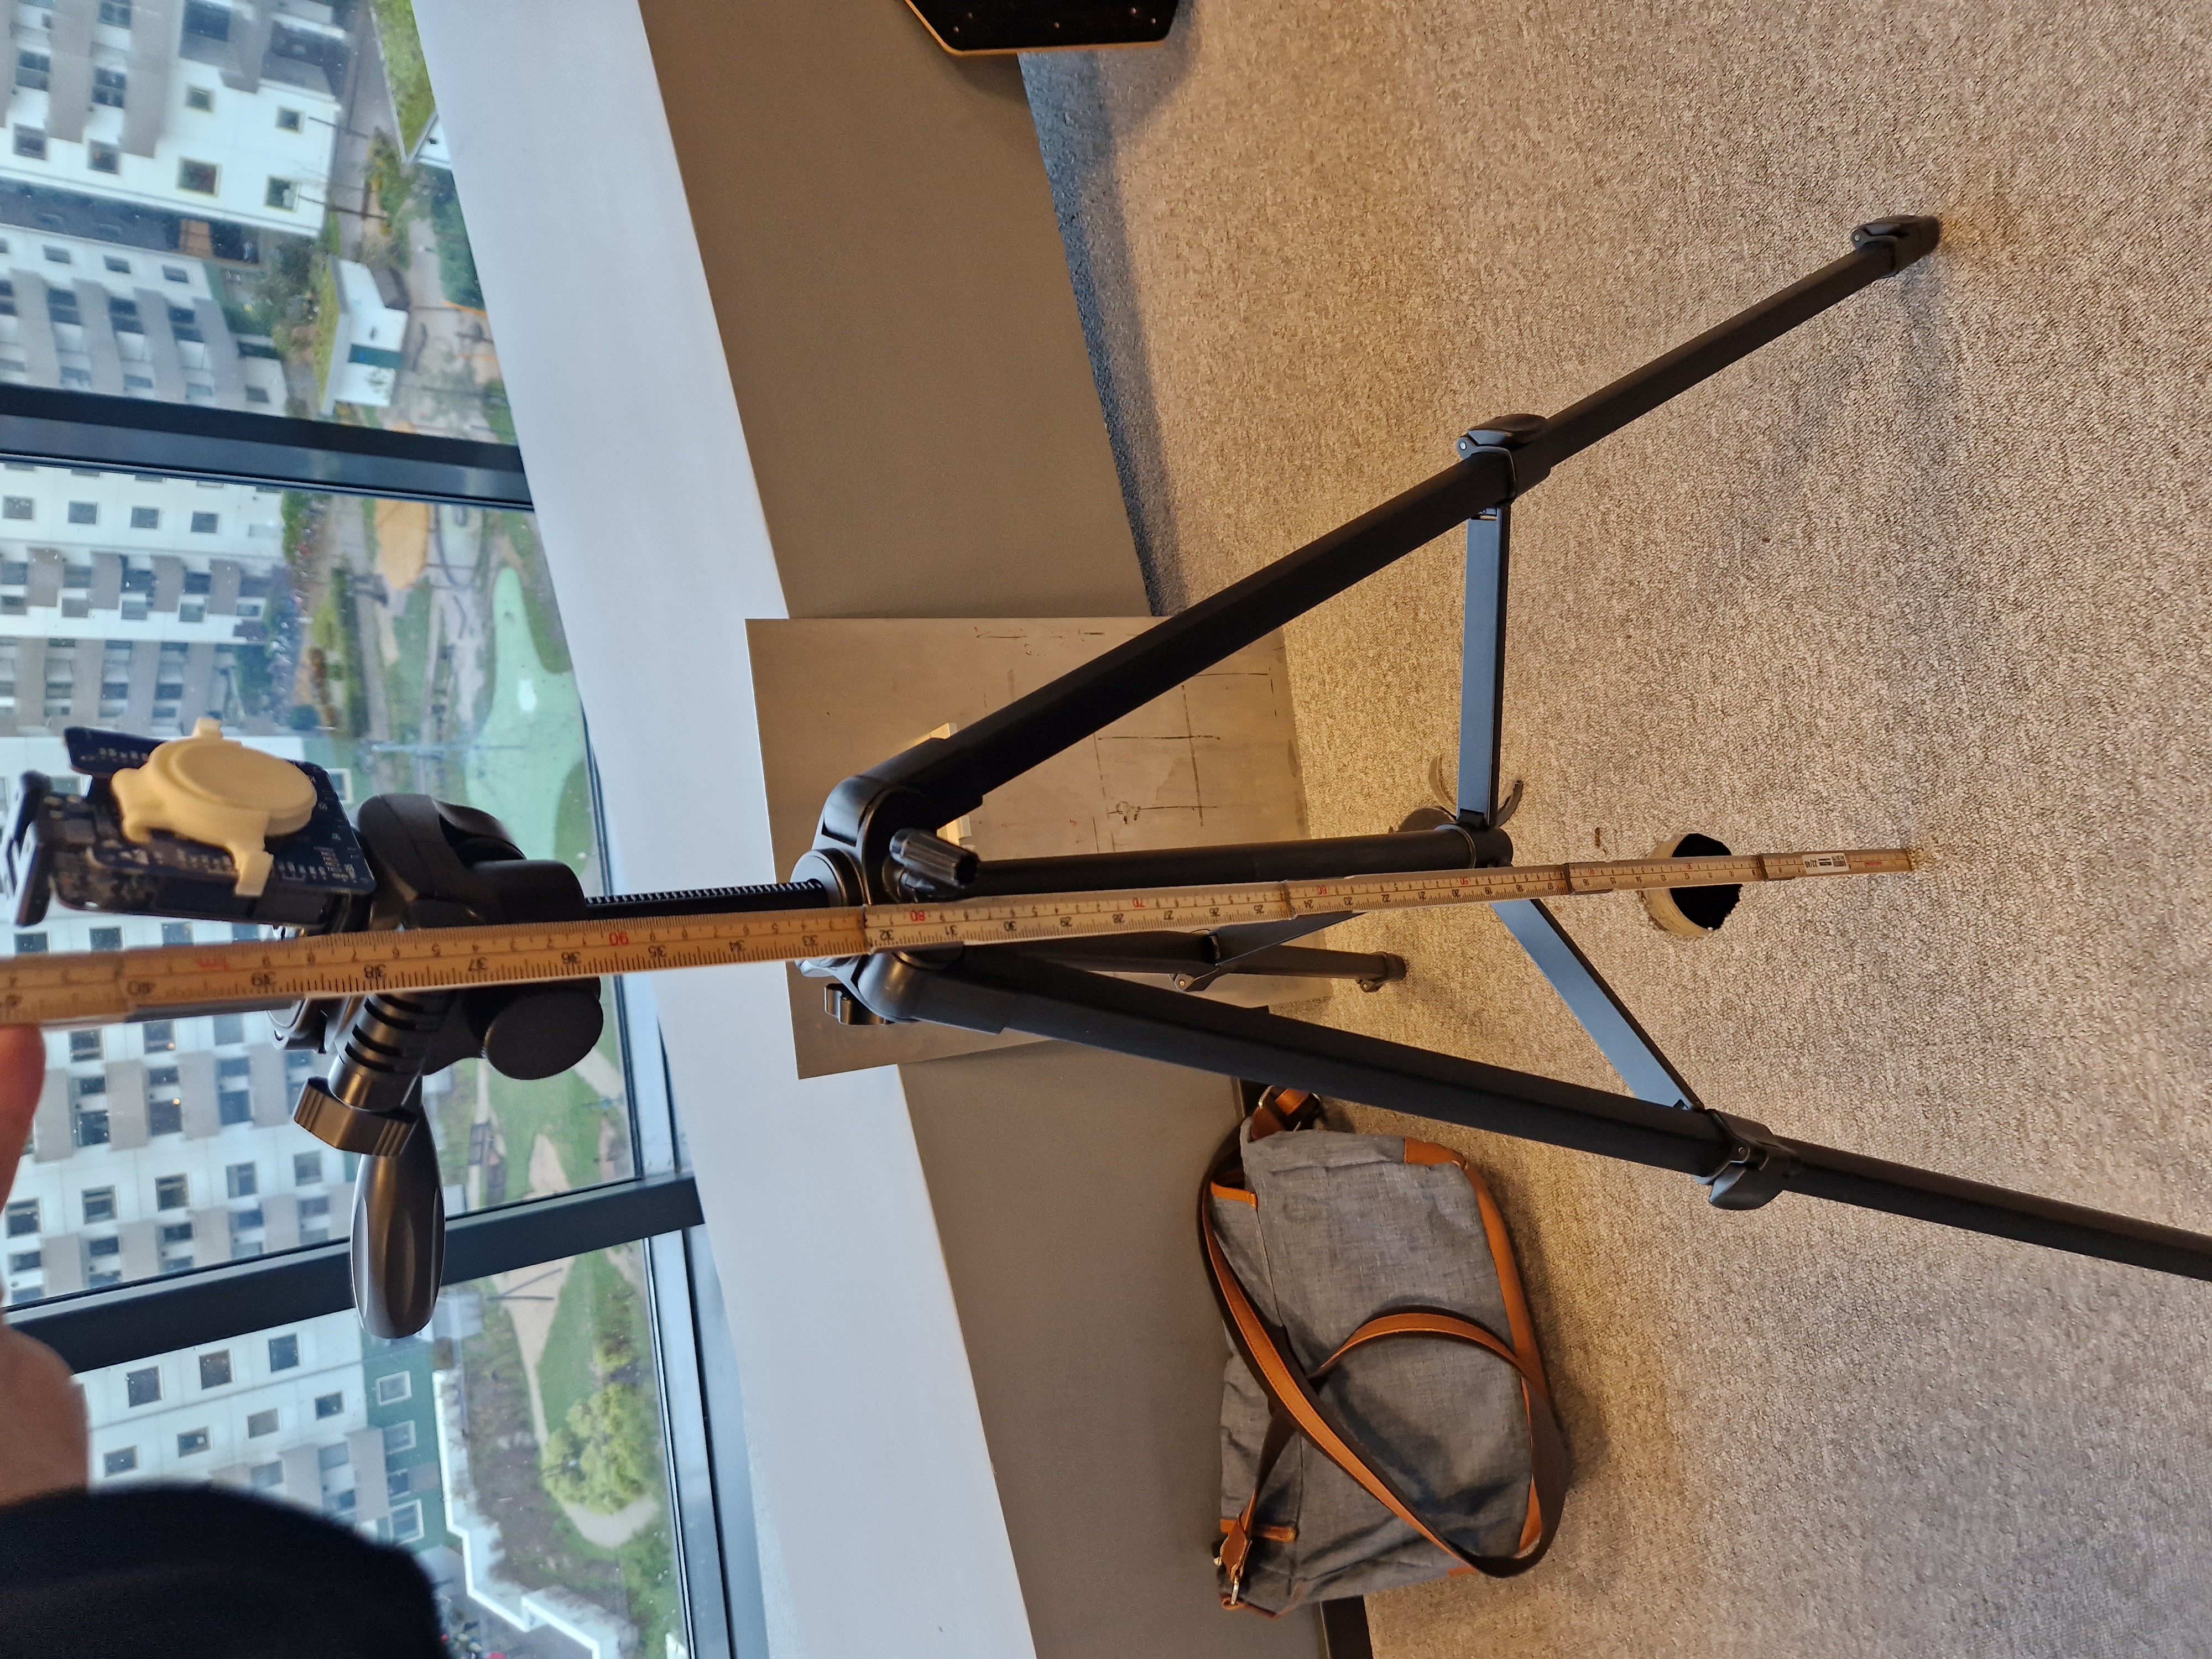
Figure 25 Test setup for the pole mounted testing, note that the sensor is tilted slightly downwards (about 20 degrees from a ground perpendicular axis). An FZP lens was also used, as seen in the picture.#
The ground and curb mounted case is tested when the sensor looks at the car either directly underneath or from an angle (perhaps mounted at the edge of a sidewalk), both have been tested using the preset “Ground mounted” in Exploration tool. This case was tested using a reference design casing without any integrated lens.
Testing was performed by mounting the sensor in an appropriate way and measuring for 30 seconds. Performance when a person is (when applicable) moving in front of the sensor were undertaken as well. Algorithm specific settings were optimized after this, which is also reflected in the presets found in Exploration tool.
All test cases were fully completed without any issues.
The obstruction system was tested by obstructing the sensor with different objects. The temperature tested by calibrating the sensor in ambient room temperature and then placing the sensor in a freezer as well as taking it outside during a cold winter day in Sweden. No issues with the obstruction detection were found during these tests.
Temperature#
All parking tests have been performed outside in southern Swedish winter conditions (around 0 degrees Celsius ambient temperature) while the sensor was calibrated in indoor conditions. So a temperature difference slightly below 20 degrees was experienced without issue.
Obstruction Detection#
The obstruction detection has been tested in a temperature oven by first calibrating in ambient (25 degrees) and then heating/cooling and performing an obstruction in regular intervals. The obstruction (under default settings) works to 22 degrees deviation, where the sensor start to report constant obstruction.
Exploration Tool Python API#
Reference Application Configuration#
- class acconeer.exptool.a121.algo.parking._ref_app.RefAppConfig(*, range_start_m: float = 0.3, range_end_m: float = 1.5, hwaas: int = 32, profile=Profile.PROFILE_2, update_rate: float = 10.0, queue_length_n: int = 5, amplitude_threshold: float = 15.0, weighted_distance_threshold_m: float = 0.1, signature_similarity_threshold: float | None = 60.0, obstruction_detection: bool = False, obstruction_distance_threshold: float = 0.06, obstruction_start_m: float = 0.03, obstruction_end_m: float = 0.05)#
- range_start_m: float#
Start of measurement range (m).
- range_end_m: float#
End of measurement range (m).
- hwaas: int#
HWAAS. This parameter has an impact on the overall signal to noise ratio (SNR), low values will yield a noisy signal and poorer performance, since the signature will vary more due to noise variations.
- profile: Profile#
Profile. This parameter determines the length of the pulse. If the range is within the so called “direct leakage”, the performance of the algorithm will deteriorate. For close ranges (i.e. ground mounted applications), it is recommended to use profile 1 or 2. For longer ranges, higher profiles should be used. The limitations that the range puts on profile choices is implemented in the Exploration tool GUI and can be experimented with there.
- update_rate: float#
Update rate.
- queue_length_n: int#
Number of consecutive samples stored.
- amplitude_threshold: float#
Threshold level in times the noise level to trigger.
- weighted_distance_threshold_m: float#
Max distance between two signatures to consider samples similar.
- signature_similarity_threshold: float | None#
How large fraction of signatures have to be within distance threshold to detect car.
- obstruction_detection: bool#
If obstruction detection should be active. This costs some extra battery power.
- obstruction_distance_threshold: float#
Determines how large fraction of each dimension the obstruction measurement can vary without considering the sensor obstructed. E.g. if the threshold is set to 0.06 and the range is between 0.02 m and 0.05 m. The weighted distance part of the signature can vary (0.05 m - 0.02 m) * 0.06 = 0.0018 m.
- obstruction_start_m: float#
Start of obstruction detection range. The detection range should not intersect with the detection range for the main functionality.
- obstruction_end_m: float#
End of obstruction detection range. The detection range should not intersect with the detection range for the main functionality.
Reference Application Result#
- class acconeer.exptool.a121.algo.parking._ref_app.RefAppResult(*, car_detected: bool = False, obstruction_detected: bool = False, extra_result: RefAppExtraResult)#
- car_detected: bool#
Boolean indicating if a car is present.
- obstruction_detected: bool#
Boolean indicating whether something is obstructing the sensor.
- extra_result: RefAppExtraResult#
Extra information for plotting.